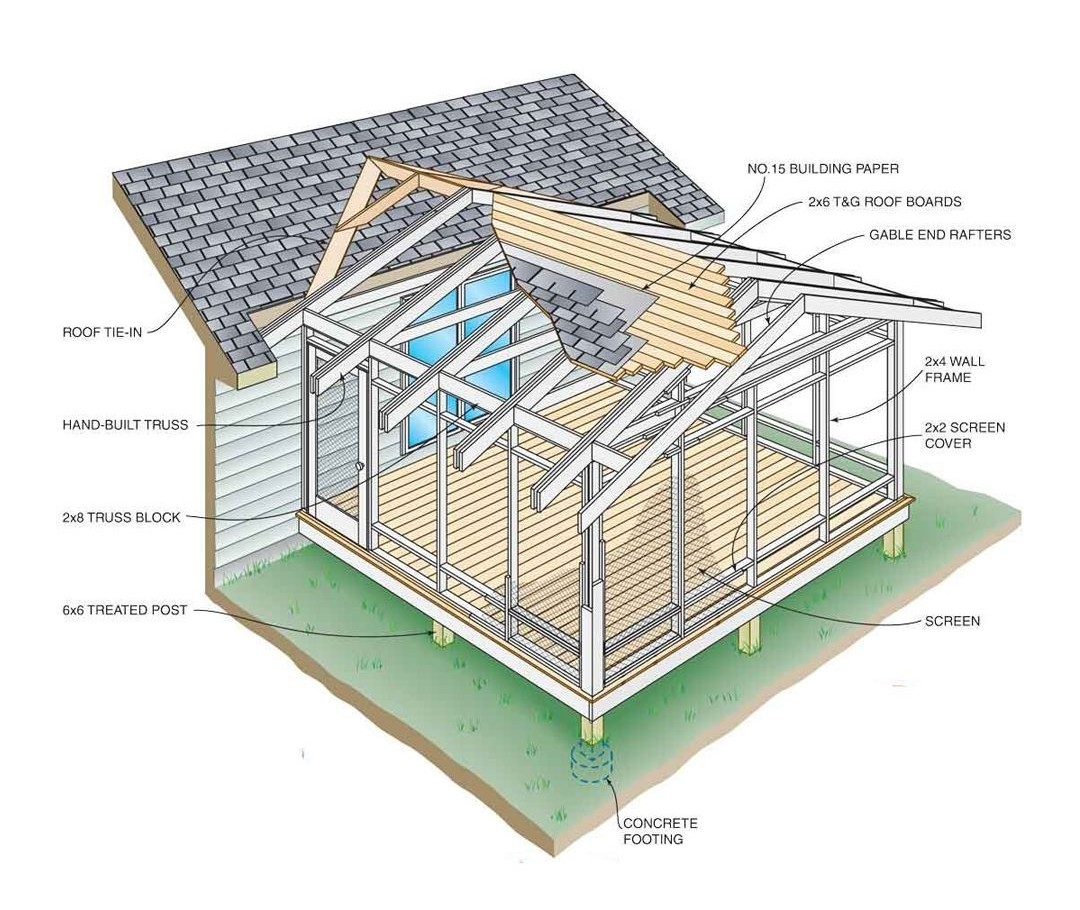
This detailed illustration provides a comprehensive breakdown of the construction process for building a screened-in porch. It meticulously labels the various structural components and their arrangement, offering a visual roadmap for DIY enthusiasts and those looking to understand the anatomy of such an addition to their home. Let’s dissect the elements presented:
1. Foundation and Support:
- Concrete Footing: The foundation of the porch rests upon concrete footings embedded in the ground. These footings provide a stable and level base, distributing the weight of the structure and preventing settling.
- 6×6 Treated Post: Rising from the concrete footings are sturdy 6×6 inch treated wooden posts. The treatment ensures resistance to rot, decay, and insect infestation, crucial for ground-contact applications and long-term durability. These posts serve as the primary vertical supports for the entire porch structure.
2. Floor Structure:
- While the illustration doesn’t explicitly detail the subfloor construction, we can infer the presence of joists spanning between the support posts, creating a solid base for the finished flooring (not shown). The treated posts would be securely connected to these joists, forming a robust floor frame.
3. Wall Framing:
- 2×4 Wall Frame: The perimeter walls of the screened-in porch are constructed using a 2×4 inch wooden frame. This standard framing lumber provides the necessary structural support for the screens and the roof. The frame would consist of vertical studs, top and bottom plates, and potentially horizontal blocking for added stability and screen attachment.
4. Screen System:
- 2×2 Screen Cover: Attached to the inner side of the 2×4 wall frame is a narrower 2×2 inch frame, specifically designed to hold the screening material. This creates a defined area for the screen to be stretched and secured.
- Screen: The illustration clearly shows the screening material stretched taut across the 2×2 screen cover. This mesh material allows for airflow while keeping insects out, making the porch a comfortable outdoor living space. The method of attachment (staples, spline, etc.) isn’t detailed but is a crucial step in the actual construction.
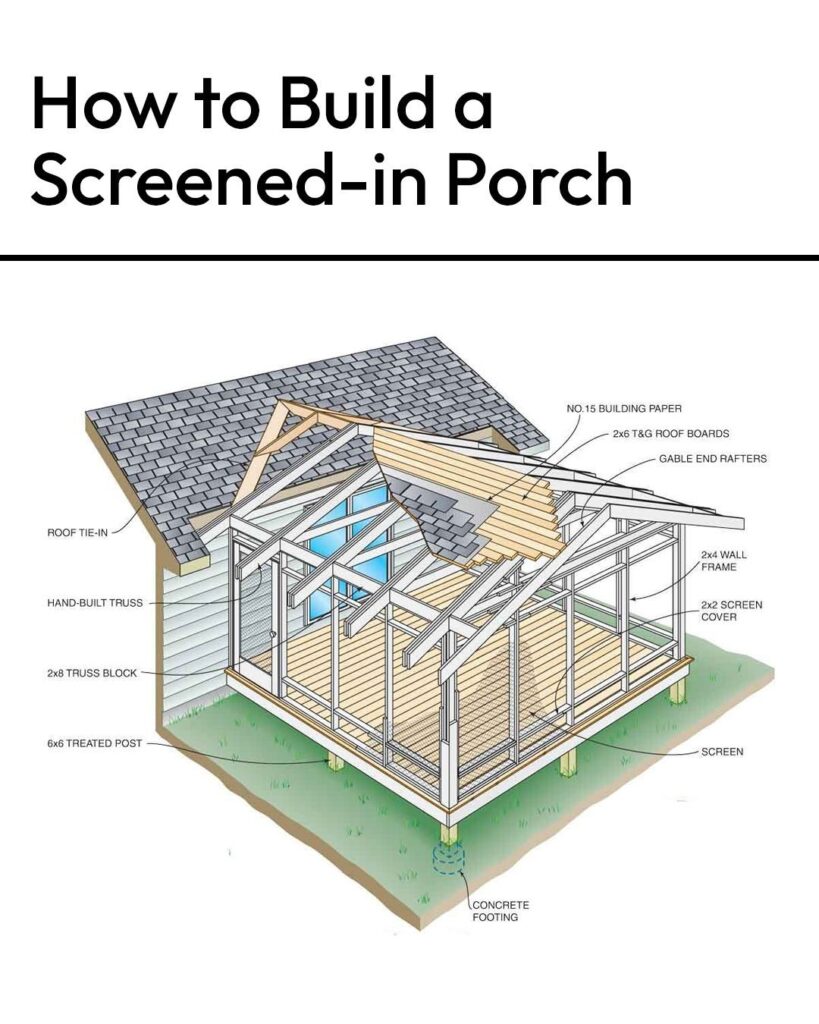
5. Roof Structure:
- Hand-Built Truss: The illustration highlights a hand-built roof truss. Trusses are engineered structural elements that span the width of the porch and provide support for the roof sheathing and covering. “Hand-built” suggests that these trusses are constructed on-site using individual lumber pieces connected with fasteners.
- 2×8 Truss Block: These blocks, made of 2×8 inch lumber, are likely used to provide additional support and connection points within the truss assembly, ensuring its structural integrity.
- Gable End Rafters: At the gable ends (the triangular ends of the roof), individual rafters are used to frame the roofline. These rafters extend from the top plate of the end wall framing up to the ridge.
- 2×6 T&G Roof Boards: The roof deck is constructed using 2×6 inch tongue-and-groove (T&G) boards. The interlocking tongue and groove create a solid and continuous surface for the roofing material.
- No. 15 Building Paper: A layer of No. 15 building paper (tar paper or felt paper) is shown installed over the roof boards. This acts as a moisture barrier, protecting the wood sheathing from water damage before the final roofing is applied.
- Roof Tie-In: Where the new porch roof meets the existing house roof, a “roof tie-in” is crucial for preventing leaks. This typically involves careful flashing and sealing to create a watertight transition between the two roof surfaces.
- Shingles (Implied): While not explicitly labeled, the top layer of the roof is depicted with a pattern indicative of asphalt shingles, a common and durable roofing material.
Overall Construction Flow (Inferred):
Based on the illustration, the construction of the screened-in porch would likely follow these general steps:
- Establish the Foundation: Dig and pour concrete footings at the designated locations.
- Install Support Posts: Securely attach the 6×6 treated posts to the concrete footings.
- Build the Floor Frame: Construct a floor frame supported by the posts (details not shown).
- Erect Wall Framing: Build the 2×4 wall frames around the perimeter of the porch floor.
- Construct Roof Trusses: Assemble the hand-built roof trusses and position them on top of the wall frames, securing them with truss blocks. Frame the gable ends with rafters.
- Install Roof Decking: Attach the 2×6 tongue-and-groove boards to the rafters and trusses.
- Apply Underlayment: Cover the roof decking with No. 15 building paper.
- Install Roofing: Apply the final roofing material (e.g., shingles).
- Attach Screen Framing: Install the 2×2 screen cover to the inside of the wall frames.
- Install Screening: Stretch and secure the screen material over the 2×2 frames.
- Tie-in to Existing Roof: Carefully integrate the new porch roof with the existing house roof to ensure a watertight seal.
- Add Finishing Touches: Install any desired flooring, trim, doors, or other features (not shown).
This illustration serves as a valuable visual guide, highlighting the key structural elements and their relationships in the construction of a screened-in porch. While it doesn’t provide specific measurements or detailed instructions, it offers a solid understanding of the fundamental components involved in creating this enjoyable outdoor living space.