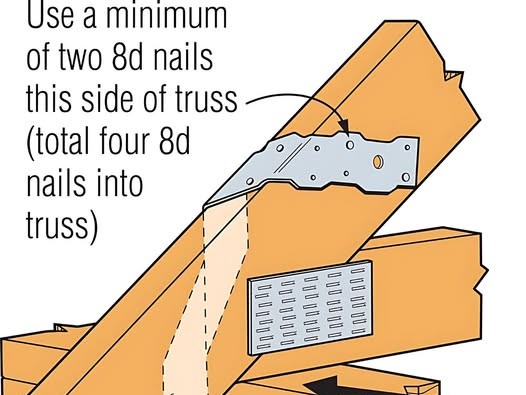
This detailed illustration demonstrates the proper installation of a hurricane tie, a crucial metal connector used in construction to securely fasten roof trusses or rafters to wall top plates and studs. These ties are particularly important in regions prone to high winds, such as hurricane zones, as they provide significant resistance against uplift forces that can lift roofs off walls during severe weather events. The diagram highlights the specific nailing requirements for this type of connector, emphasizing the importance of correct installation for optimal performance and structural integrity.
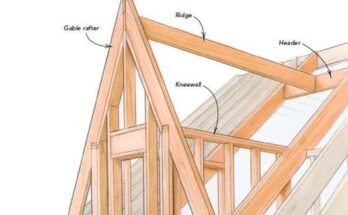
The illustration depicts a typical scenario where a roof truss (the angled wooden member at the top) is being connected to the top plate (the horizontal wooden member resting on the wall studs) and the wall studs (the vertical wooden members). The hurricane tie itself is a bent metal strap with pre-punched holes designed to accommodate nails. It wraps over the truss and is fastened to both the top plate and the wall studs.
Key elements and instructions highlighted in the diagram include:
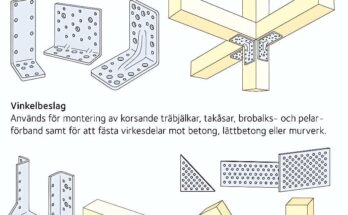
- Hurricane Tie: The silver, bent metal connector that bridges the truss, top plate, and studs. Its shape is specifically designed to resist uplift and lateral forces.
- Truss: The angled wooden member forming part of the roof structure. The diagram indicates that the hurricane tie should be fastened to the side of the truss.
- Top Plate: The horizontal wooden member that sits atop the wall studs and provides a bearing surface for the trusses or rafters. The hurricane tie is shown wrapping over the top plate.
- Wall Studs: The vertical wooden members that form the structural framing of the wall. The lower portion of the hurricane tie is securely fastened to these studs.
- Nail Requirements: The diagram explicitly specifies the type and quantity of nails required for proper installation:
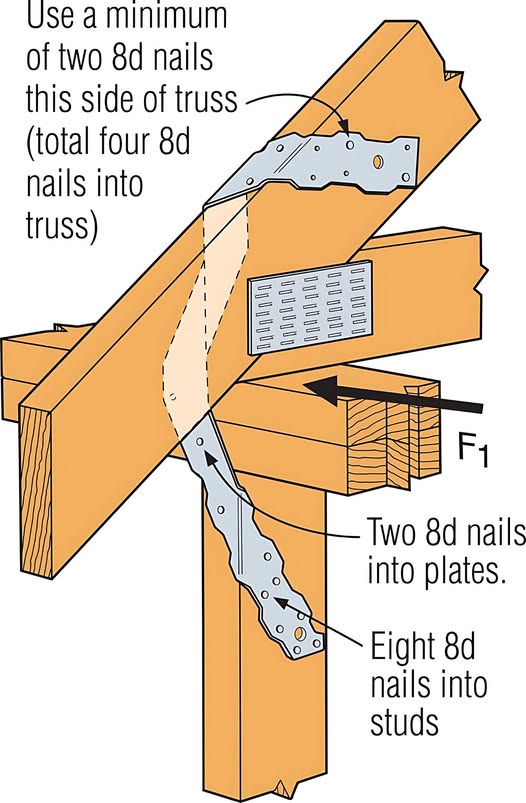
- “Use a minimum of two 8d nails this side of truss (total four 8d nails into truss)”: This instruction emphasizes that at least two 8d (eight-penny) nails must be driven through the holes in the hurricane tie into the side of the truss. The parenthetical note clarifies that a total of four 8d nails should be used to secure the tie to the truss (presumably two on each side, although only one side is fully visible). The “8d” designation refers to the size of the nail, with “d” being an abbreviation for “penny,” an old English system for nail sizing. An 8d nail is a specific length and gauge appropriate for structural connections.
- “Two 8d nails into plates”: This indicates that two 8d nails should be used to fasten the portion of the hurricane tie that wraps over and onto the top plate. These nails secure the tie to the horizontal framing member.
- “Eight 8d nails into studs”: This instruction specifies that a significant number of nails, eight 8d nails, should be used to fasten the lower portion of the hurricane tie to the wall studs. This robust connection to the vertical framing members provides substantial resistance against uplift forces acting on the roof.
- Force Arrow (F₁): A horizontal arrow labeled “F₁” points towards the side of the truss, likely representing a lateral force acting on the roof structure. The proper installation of the hurricane tie helps to resist such forces as well, contributing to the overall stability of the roof.
- Gusset Plate (Implied): The diagram also shows a metal gusset plate connecting the various members of the truss itself. This plate is a separate structural element and not part of the hurricane tie installation, but it highlights the engineered nature of the truss assembly.
Importance of Proper Installation:
The detailed nailing instructions underscore the critical nature of correct hurricane tie installation. Using the specified size and quantity of nails ensures that the connector can achieve its intended load-bearing capacity and effectively resist the forces exerted by high winds. Insufficient or incorrect nailing can compromise the integrity of the connection, potentially leading to roof damage or failure during severe weather. Building codes in hurricane-prone regions often mandate the use of hurricane ties and specify detailed installation requirements to enhance the resilience of structures against wind damage.
In conclusion, this illustration serves as a clear and concise guide to the proper installation of a hurricane tie, emphasizing the specific nailing patterns required to securely anchor a roof truss to the wall framing. By adhering to these guidelines, builders can significantly improve the wind resistance of structures, protecting them against the destructive forces of hurricanes and other high-wind events. The diagram highlights the importance of using the correct type and number of fasteners to ensure the effectiveness of this vital structural connector.